TABLE OF CONTENTS
FUNCTIONAL DESCRIPTION
The Steamrock NB-42 digital barograph detects and records changes in atmospheric pressure. It displays current atmospheric pressure, a graph showing changes in that pressure over 84 hours, and a World Meteorological Organization (WMO) symbol depicting a tendency. Beneath that symbol is a numeric value representing net value changes over the past three hours.
Atmospheric pressure is measured every 15 minutes and is stored in a built-in memory. Results are shown on a high-contrast sunlight readable e-paper display.
This device requires the use of a dedicated smartphone app for setting up and controlling it, utilizing NFC technology. However, after setup, it acts as a standalone unit that does not require software updates, an internet connection, or an external power supply. It operates on three AAA batteries, displaying the remaining charge using both a battery icon and a percentage.
Although this barograph is not a tool for extremely precise lab measurement, it is perfectly suitable for keeping track of atmospheric pressure tendencies and providing early warnings of significant weather events. Thus, it can be used as an aid to navigation and an instrument for weather observation.
DISPLAY
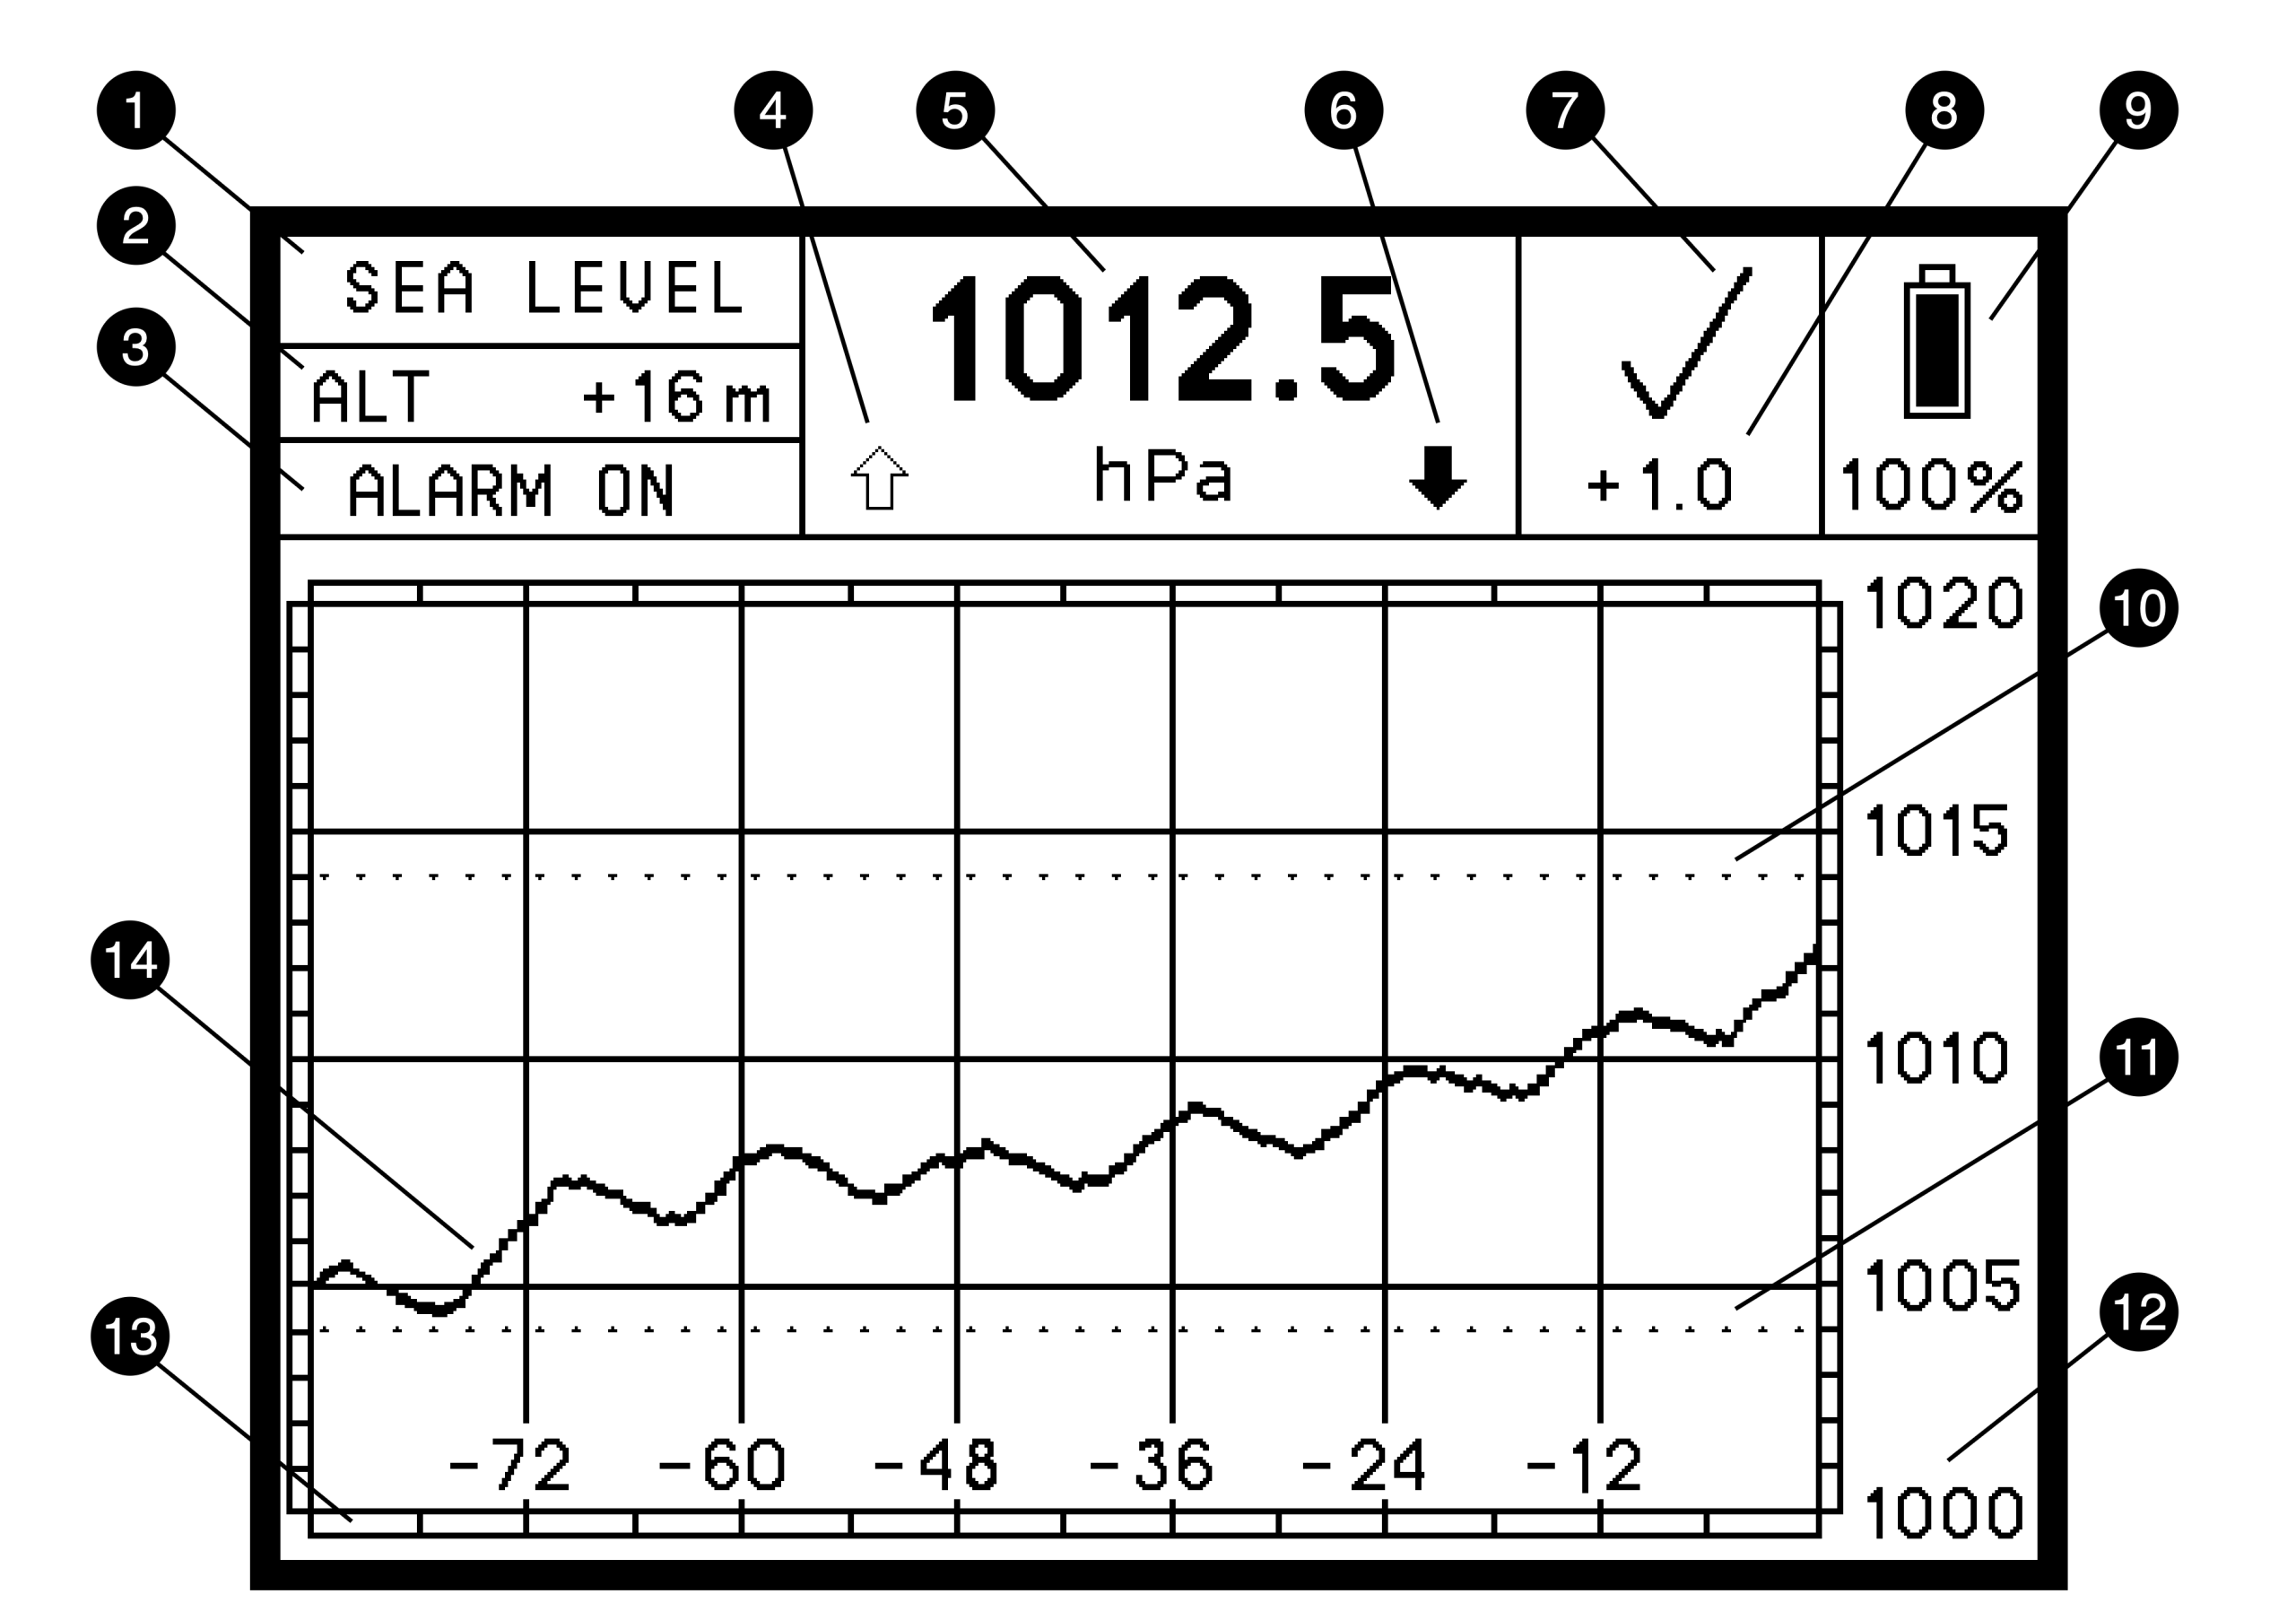
- Pressure Display Mode
There are two atmospheric pressure display modes:- SEA LEVEL – In this mode, the device will calculate and display atmospheric pressure reduced to sea level.
- STATION – In this mode, the device will display actual atmospheric pressure at its location when the elevation is set to zero.
- Elevation
Elevation above or below sea level is displayed in meters or feet. Refer to SETTING THE UNITS and SEA LEVEL PRESSURE AND ELEVATION sections for details. - Alarm Status
The “ALARM ON” message indicates if any of the four alarms are currently set. If no alarm is set, the message “ALARM OFF” will be displayed. - Rising Trend Alarm Indicator
The upwards pointing arrow indicates a rising trend alarm status. The arrow will be filled if this alarm is set. - Current Atmospheric Pressure
Current atmospheric pressure is read every 15 minutes. The 15-minute period starts once the batteries have been installed, when the device has been reset, any time a pushbutton is pressed, or when settings are transferred from the smartphone app via NFC. - Falling Trend Alarm Indicator
The downwards pointing arrow indicates a falling trend alarm status. The arrow will be filled if this alarm is set. - Three-hour Pressure Tendency Symbol
A WMO symbol is used to represent the characteristics of atmospheric pressure tendency during the three hours preceding the time of the current pressure reading, as described in the WMO manual: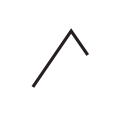 Code 0: Increasing, then decreasing; atmospheric pressure the same as or higher than three hours ago.
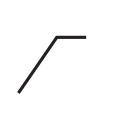 Code 1: Increasing, then steady; or increasing, then increasing more slowly; atmospheric pressure now higher than three hours ago.
 Code 2: Increasing (steadily or unsteadily); atmospheric pressure now higher than three hours ago.
 Code 3: Decreasing or steady, then increasing; or increasing, then increasing more rapidly; atmospheric pressure now higher than three hours ago.
 Code 4: Steady; atmospheric pressure the same as three hours ago.
 Code 5: Decreasing, then increasing; atmospheric pressure the same as or lower than three hours ago.
 Code 6: Decreasing, then steady; or decreasing, then decreasing more slowly; atmospheric pressure now lower than three hours ago.
 Code 7: Decreasing (steadily or unsteadily); atmospheric pressure now lower than three hours ago.
 Code 8: Steady or increasing, then decreasing; or decreasing, then decreasing more rapidly; atmospheric pressure now lower than three hours ago.
- Three-hour Pressure Tendency
The three-hour pressure tendency number represents the difference between atmospheric pressure now and three hours ago. A positive number indicates that the pressure is now higher than three hours ago; a negative number indicates that it is now lower. If, for any reason, this number exceeds ± 99 hPa or ± 2.99 inHg, the symbol “—” will replace the numbers. - Battery State
A battery icon and a percentage value provide information on the level of battery charge. Refer to BATTERIES section for details. - Pressure Alarm Upper Threshold Line
Upper pressure alarm threshold value is displayed as a dashed line on the pressure graph. - Pressure Alarm Lower Threshold Line
Lower pressure alarm threshold value is displayed as a dashed line on the pressure graph. - Pressure Scale
The device has five pressure scale ranges. The scale adjusts automatically to fit the graph to the screen, depending on the difference between maximal and minimal pressure displayed.- For hPa:
- The scale range is divided into 20 units, with their values depending on the maximal and minimal pressure displayed. The range the device uses most of the time is 20 hPa (e.g., 1000 ~ 1020 hPa or 1005 ~ 1025 hPa) divided into 1 hPa units.
- If the pressure change during the past 84 hours is more than 11 and less than 22 hPa, which may happen during a significant weather event or if the device is relocated to a different elevation, the range will be 40 hPa (e.g., 990 ~ 1030 hPa) divided into 2 hPa units.
- The other three rarely used scale ranges are a 100 hPa range divided into 5 hPa units, a 200 hPa range divided into 10 hPa units, and a 400 hPa range divided into 20 hPa units. These ranges would be chosen automatically if the pressure change during the past 84 hours was more than 22 and less than 55 hPa, more than 55 and less than 110 hPa, or more than 110 and less than 240 hPa, respectively.
- For inHg:
- The scale range is divided into 8 units, with their values depending on the maximal and minimal pressure displayed. The range the device uses most of the time is 0.8 inHg (e.g., 29.2 ~ 30.0 inHg or 29.4 ~ 30.2 inHg) divided into 0.1 inHg units.
- If the pressure change during the past 84 hours is more than 0.44 and less than 0.88 inHg, which may happen during a significant weather event or if the device is relocated to a different elevation, the range will be 1.6 inHg (e.g., 29.1 ~ 30.7 inHg) divided into 0.2 inHg units.
- The other three rarely used scale ranges are a 4 inHg range divided into 0.5 inHg units, an 8 inHg range divided into 1 inHg units, and a 16 inHg range divided into 2 inHg units. These ranges would be chosen automatically if the pressure change during the past 84 hours was more than 0.88 and less than 2.2 inHg, more than 2.2 and less than 4.4 inHg, or more than 4.4 and less than 8.8 inHg, respectively.
- The graph will accommodate a big change in pressure by reducing its vertical range, making differences slightly more difficult to distinguish. The device will automatically adjust the graph over the next 84 hours. If you do not want to wait for it to adjust the graph automatically, you can clear the pressure history records. Please refer to CLEARING PRESSURE HISTORY section for details.
- For hPa:
- Time Scale
The numbers and their corresponding vertical lines represent the number of hours that have passed since the most recent pressure reading. - Graph
The graph depicts the history of atmospheric pressures measured over the past 84 hours.
NFC
This device requires the use of a dedicated smartphone app for setting up and controlling it, utilizing NFC (Near Field Communication) technology that is present in most modern smartphones. The free Steamrock NB-42 Barometer app can be installed on both iOS and Android devices.
The available settings are:
- Upper pressure alarm threshold
- Lower pressure alarm threshold
- Rising 3-hour trend alarm threshold
- Falling 3-hour trend alarm threshold
- Elevation value
- Pressure units
- Elevation units
- Graph options
- Theme options
- Alarm sound repeat
Using the app, you can also:
- Clear pressure history
- Adjust calibration offset
- Perform factory reset
Please refer to the corresponding sections below for details.
Once the desired settings are selected in the app, touch the SET button at the bottom of the app screen and bring your smartphone’s NFC antenna area to the center of the NB-42 display within 25 mm (≈ 1 inch). Successful data transfer will be confirmed by a single beep and display update.
SETTING THE UNITS
You can choose the units for pressure: hectopascals (hPa) or inches of mercury (inHg), and the units for elevation: meters (m) or feet (ft). Select the preferred units in the app and transfer new settings to NB-42 as described in NFC section of this manual.
SEA LEVEL PRESSURE AND ELEVATION
Pressure display mode can be chosen by the toggle switch in Sea Level Pressure section of the app. When this toggle switch is off, the STATION pressure display mode is used.
If the SEA LEVEL mode is chosen (toggle switch is on), you can set the elevation value by choosing the desired number from the drop-down list in the app. Transfer new settings to NB-42 as described in NFC section of this manual.
The elevation can be set at any whole number between -200m and +1500m or between -656ft and +4921ft.
CLEARING PRESSURE HISTORY
You can clear the pressure history records and manually set the 20 mb (hPa) or 0.8 inHg pressure scale, for example, when you have relocated the device to a very different elevation and do not want to wait for the device to automatically adjust its scale range over time.
This can be done either by using the pushbutton located at the back of the device or using the app.
To clear the pressure history data using the pushbutton, press and hold it. You will hear a short beep. Continue holding the pushbutton. Once you hear a triple beep approximately 5 seconds later, release the pushbutton. The screen will be updated, showing the current pressure and a flattened graph set at the smallest scale range.
To clear the pressure history data using the app, go to Advanced Settings tab, select Clear Pressure History, and touch the OK button. Then bring your smartphone’s NFC antenna area to the center of the NB-42 display within 25 mm (≈ 1 inch). A single beep and display update will indicate that the pressure history data has been successfully cleared.
FACTORY RESET
You can perform a factory reset either by using the pushbutton located at the back of the device or using the app.
To reset the device using the pushbutton, press and hold it. You will hear a short beep. Continue holding the pushbutton. Approximately 5 seconds later, you will hear a triple beep. Keep holding it until you hear a single long beep, then release the pushbutton.
The screen will be updated, showing the QR code on a white background.
To reset the device using the app, go to Advanced Settings tab, select Factory Reset, and touch the OK button. Then bring your smartphone’s NFC antenna area to the center of the NB-42 display within 25 mm (≈ 1 inch). A single beep and display update will indicate that the device has been successfully reset. This procedure will set the default settings for the app as well.
SETTING THE CALIBRATION
Your barograph is shipped with the calibration (correction) setting already preset. You may want to introduce your own calibration offset, for example, when you see it is slightly differing from a trusted local source or if you need to adjust for normal sensor drift.
To adjust the calibration offset using the app, go to Advanced Settings tab, select the desired number from the drop-down list, and touch the OK button. Then bring your smartphone’s NFC antenna area to the center of the NB-42 display within 25 mm (≈ 1 inch). Successful calibration will be confirmed by a single beep and display update.
The calibration offset can be adjusted as much as ±10 hPa or ±0.3 inHg.
GRAPH OPTIONS
To choose a graph option, use the LINE or FILL buttons in the app.
Transfer new settings to NB-42 as described in NFC section of this manual.
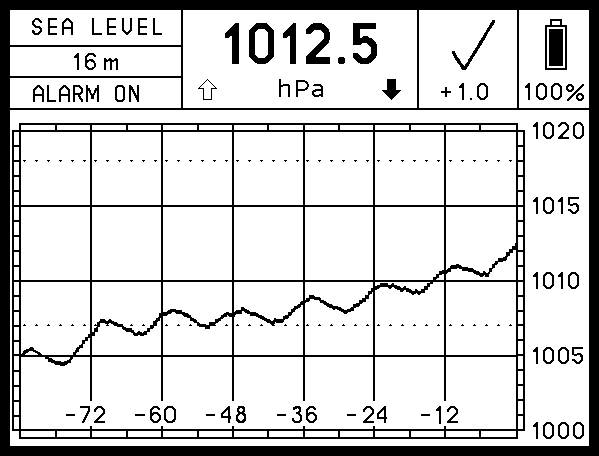
LINE
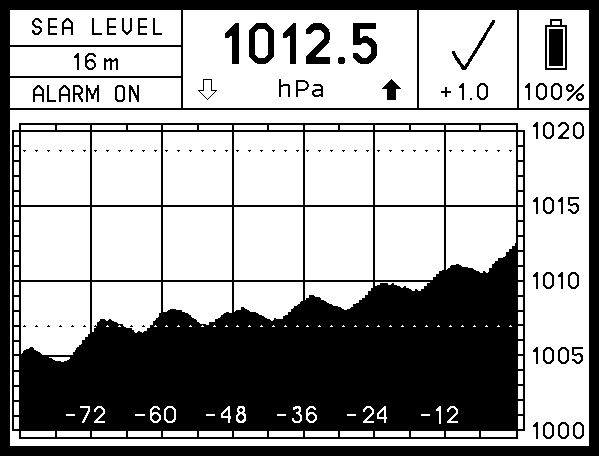
FILL
THEME OPTIONS
There are two theme options: light and dark. To choose between them, use the LIGHT or DARK buttons in the app. Transfer new settings to NB-42 as described in NFC section of this manual.
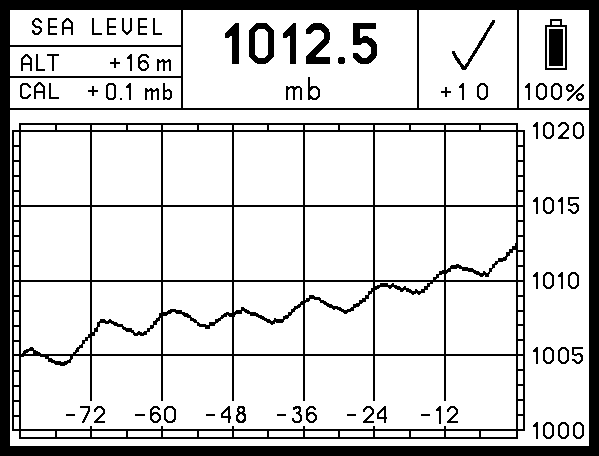
LIGHT
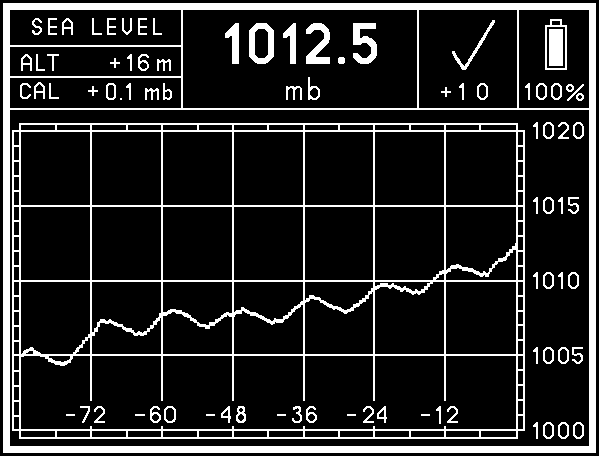
DARK
ALARMS
There are four independent alarms that can be set: two pressure alarms (Upper and Lower) and two 3-hour trend alarms (Rising and Falling). Use the smartphone app to set desired alarm thresholds.
Upper pressure alarm triggers when the atmospheric pressure rises to equal or above the selected alarm threshold. Note that if you attempt to set the Upper pressure alarm threshold below the Lower one, the latter will automatically adjust to a smaller number.
Lower pressure alarm triggers when the atmospheric pressure falls to equal or below the selected alarm threshold. Note that if you attempt to set the Lower pressure alarm threshold above the Upper one, the latter will automatically adjust to a greater number.
Trend alarm will trigger when the anticipated 3-hour pressure change (based on the previous 1-hour history) exceeds the selected threshold. This provides an early warning of significant weather events.
When any alarm triggers, it will sound once or every 15 minutes (if the alarm conditions persist), depending on the Alarm sound repeat setting (ONCE or REP).
Pressure alarm thresholds can be set at any number between 500 and 1100 hPa, or 14.79 and 32.46 inHg, with a 1 hPa or 0.03 inHg increment, respectively. To adjust the pressure alarm threshold, activate the particular alarm using the toggle switch in the app and choose the value scrolling pre-set numbers.
Rising trend alarm threshold can be set at any number between 1 and 10 hPa, or 0.03 and 0.3 inHg, and Falling trend alarm threshold can be set at any number between -1 and -10 hPa, or -0.03 and -0.3 inHg with a 1 hPa or 0.03 inHg increment, respectively.
These numbers represent the anticipated 3-hour pressure change.
To adjust the trend alarm threshold, activate the particular alarm using the toggle switch in the app and choose the value scrolling pre-set numbers. Once the desired settings are selected, transfer them to NB-42 as described in NFC section of this manual.
The chosen pressure alarm thresholds will be displayed as horizontal dashed lines in the graph area (if within the current range scale). The and arrows in the current atmospheric pressure window will indicate the activated trend alarms, if filled.
You can disable any alarm independently using the app.
BATTERIES
- Use high-quality batteries only. Panasonic EVOLTA AAA alkaline batteries are recommended for this device.
- NiMH rechargeable batteries can be used, but the battery charge state (displayed on the screen) will not be correct, and the operating time will be shorter.
- Zinc-carbon batteries are not recommended for this device.
- Lithium primary batteries were not tested with this device.
- Replace all batteries at the same time. Do not mix old and new batteries, and do not mix different types of batteries or batteries produced by different manufacturers.
- When installing the batteries, be sure to observe the polarity marked in the battery holders. In this device, all positive terminals are up.
- When new batteries are inserted, the device will restart automatically. It will measure current atmospheric pressure and display it on the screen along with the data previously stored in the memory. The 15-minute period will start at this time.
- When the battery charge falls below operating limits, you will see the warning message “REPLACE BATTERIES” on a blank screen. The device will also produce a beep to the tone of the Morse code letter “B” (- …) once.
- When you see the “REPLACE BATTERIES” warning, replace or remove the old batteries as soon as possible. Leakage of the discharged batteries can cause permanent damage to the device.
- No matter if the batteries are low or removed, the device will keep previous records and settings in its internal memory. There may be a sudden discordant “step” on the graph if you replace the batteries a while after you have noticed the warning message “REPLACE BATTERIES” due to changes in atmospheric pressure that have occurred during downtime.
- Before leaving the device unattended for a prolonged period of time, check the battery charge. If the battery charge is low, you may want to replace or remove the batteries to keep them from falling below operating limits while unattended and prevent battery leakage.
WARNING MESSAGES
The device might show one of two warning messages on a blank screen :
- “OUTSIDE OPERATING LIMITS” will be displayed if the measured pressure or temperature is higher or lower than stated in OPERATING LIMITS section, or if the sensor malfunctions. The device will continue monitoring the pressure and temperature every 15 minutes. Once the measured values return to the designated range limits, the device will automatically resume normal operation.
- “REPLACE BATTERIES” will be displayed when the charge of the batteries falls below operating limits. No measurements will be taken while this message is on the screen. It is strongly recommended that you replace or remove the batteries when this message appears. Refer to BATTERIES section of this manual for more details.
CAUTION
- This device was designed for indoor use only. Although the face of the device is generally splash-proof, it should not be exposed to rain or liquids from other sources, such as cleaning.
- Do not clean this device with chemicals, expose it to direct sunlight, or operate it below 0 °C (32 °F).
- If the device’s batteries have been replaced, the device has been reset, or the calibration offset or elevation number has been adjusted, it will take 3 hours to get a fully accurate 3-hour tendency symbol and 3-hour pressure tendency.
- Electronic paper displays do not need power to retain their images. Therefore, this device will continue displaying the last image on the screen even in the unlikely event of a malfunction or loss of power.
- In no case should this device be used as the sole basis for weather prediction or navigation decisions. The user assumes sole responsibility, legal or otherwise, for these decisions.
MOUNTING INSTRUCTIONS
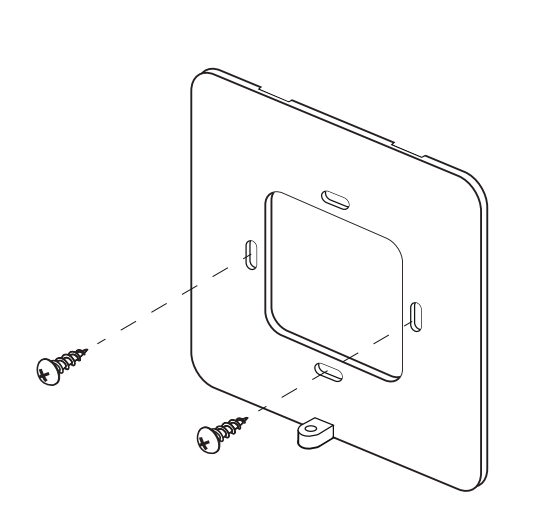
1. Remove the mounting plate from the back of the device using the provided Phillips mini screwdriver.
2. Using the two stainless screws provided and your own screwdriver, attach the mounting plate to the bulkhead or wall with its top indented slots facing the wall and the bottom bracket with a threaded bolthole facing outwards.
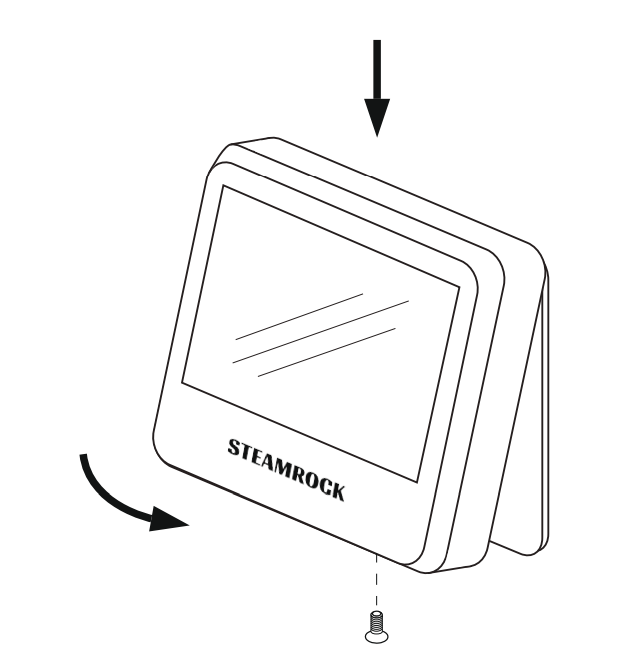
3. After inserting the batteries, mount the device on the bulkhead or wall by inserting the small flat hooks on the top inner side of the casing into the mounting plate’s indented slots. Carefully push it in place.
4. Screw in the bolt at the bottom of the casing using the provided Phillips mini screwdriver.
SPECIFICATIONS
Dimensions: 105 x 105 x 25 mm (4.14″ x 4.14″ x 1″)
Weight: 185g (without batteries)
Power: 3 x AAA (4.5V)
Display: 4.2″ b/w e-paper (85 x 64 mm)
15-min timing accuracy: < 1%
NFC range: 25 mm (1″)
Long-term drift: < 1 hPa (0.0295 inHg) per year
Absolute accuracy: 1 hPa at 0 ~ 50°C (0.0295 inHg at 32 ~ 122°F)
OPERATING LIMITS
Pressure range: 500 ~ 1100 hPa (14.77 ~ 32.48 inHg)
Temperature: 0 ~ 50 °C (32 ~ 122 °F)
PACKAGE CONTENTS
- Steamrock NB-42 digital barograph 1
- Owner’s manual 1
- AAA batteries 3
- Phillips mini screwdriver 1
- Stainless screws 2